学習ログ詳細ページを作成しよう
今回は、投稿した学習ログの詳細ページを作成していきます。この機能により、ユーザーは特定の学習ログの内容を詳しく閲覧できるようになります。
学習の目標
本章では、以下の内容を学習します。
- 学習ログの詳細ページを作成する
- 詳細ページのビューを作成する
- 詳細ページのテストを作成する
- 詳細ページの動作を確認する
詳細ページの実装
まずは、PostsController の show アクションを修正して、詳細ページで表示する投稿データを取得できるようにします。
app/controllers/posts_controller.rb
  # ...
  def show    @post = Post.find_by(id: params[:id])  end
ここでは、URLの :id 部分をパラメータとして受け取り、その ID に該当する Post レコードをデータベースから取得しています。取得したデータは @post というインスタンス変数に格納され、これをビューで使用できるようになります。
詳細ページのビュー
次に、詳細ページのビューを作成します。対応するビューファイルは app/views/posts/show.html.erb です。
app/views/posts/show.html.erb
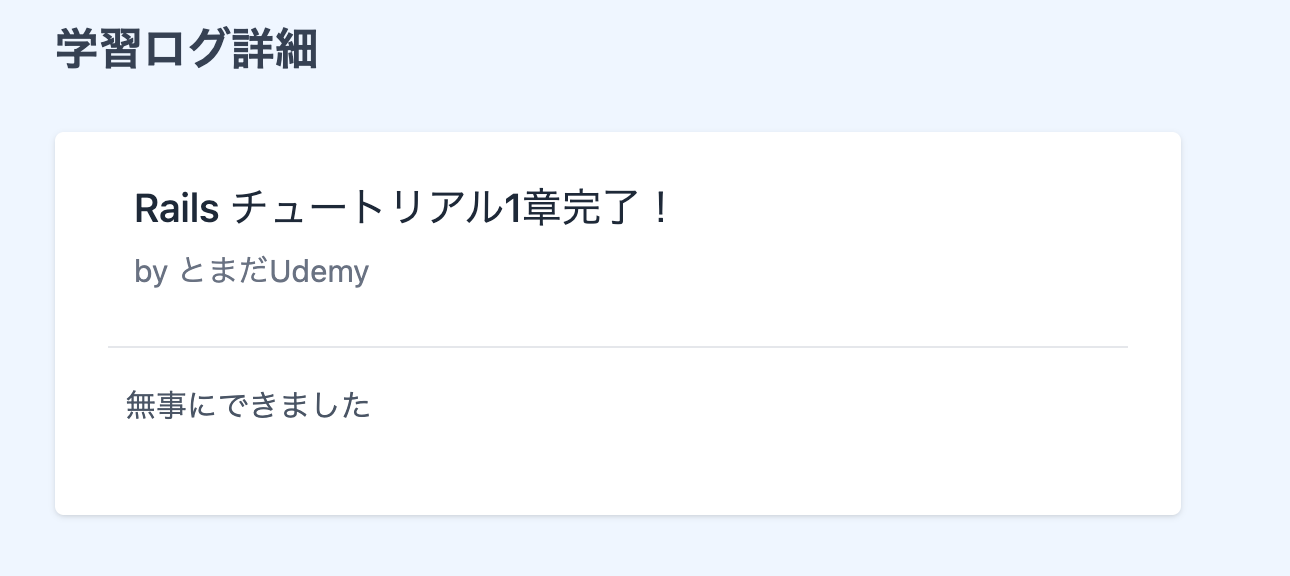
<div class="space-y-6 w-3/4 max-w-lg">  <label class="block text-xl font-bold text-gray-700">学習ログ詳細</label>
  <div class="items-center justify-center">    <div class="focus:outline-none mb-7 bg-white p-6 shadow rounded">      <div class="flex items-center border-b border-gray-200 pb-6">        <div class="flex items-start justify-between w-full">          <div class="pl-3">              <p class="focus:outline-none text-lg font-medium leading-5 text-gray-800"><%= @post.title %></p>              <p class="focus:outline-none text-sm leading-normal pt-2 text-gray-500">by <%= @post.user.nickname %></p>            </div>          </div>        </div>        <div class="px-2">          <p class="focus:outline-none text-sm leading-5 py-4 text-gray-600"><%= @post.content %></p>        </div>      </div>  </div></div>
このビューでは、コントローラーから渡された @post 変数を使って、投稿のタイトル、本文、および投稿者のニックネームを表示しています。
ここでのポイントは、@post.user.nickname という記述です。これは、Post モデルと User モデルの関連付けを利用して、投稿に紐づくユーザーの情報を取得しています。具体的には、@post.user で投稿に関連付けられた User オブジェクトを取得し、その nickname 属性を表示しています。
また、TailwindCSS を使用して適切なスタイリングを適用し、見やすいレイアウトになるよう工夫しています。
動作確認
実装したら、実際に動作確認をしてみましょう。
ログイン時
開発用サーバを起動し、投稿画面から何らかの内容を投稿します。その後、http://127.0.0.1:3000/posts/xx(xx は投稿のID、通常は 1 など)にアクセスすると、投稿の詳細画面が表示されます。

ログアウト時
次に、詳細ページのURLをコピーしてからログアウトし、同じURLに再度アクセスしてみましょう。投稿画面とは異なり、詳細ページは誰でも閲覧できるため、ログアウト状態でもそのまま詳細画面が表示されるはずです。
ここまで画面で確認できれば、基本的な詳細ページの実装は完了です。
テスト作成
実装が完了したら、その動作を保証するためのテストを書いていきます。まずは Request Spec から追加しましょう。
Request Spec
詳細ページへのアクセスを確認するテストを追加します。今回は投稿データが必要なため、テスト実行前に Post を作成しておく必要があります。
spec/requests/posts_spec.rb に以下のコードを追加します。
require 'rails_helper'
RSpec.describe 'Posts', type: :request do  before do # beforeブロックを修正    @user = create(:user)    @post = create(:post) # 追加  end
...
  describe 'GET /posts/:id' do    context 'ログインしていない場合' do      it 'HTTPステータス200を返す' do        get "/posts/#{@post.id}"        expect(response).to have_http_status '200'      end    end
    context 'ログインしている場合' do      it 'HTTPステータス200を返す' do        sign_in @user        get "/posts/#{@post.id}"        expect(response).to have_http_status '200'      end    end  endend
ここでは、ログイン状態にかかわらず、詳細ページに正常にアクセスできることを確認しています。
spec/requests/posts_spec.rb の全体像は以下のようになります。
require 'rails_helper'
RSpec.describe 'Posts', type: :request do  before do    @user = create(:user) # 各テストで使用できるユーザーを作成    @post = create(:post) # 閲覧用の Post を作成  end
  describe 'GET /posts/new' do    context 'ログインしていない場合' do      it 'HTTPステータス302を返す' do        get '/posts/new'        expect(response).to have_http_status(302)      end
      it 'ログインページにリダイレクトされる' do        get '/posts/new'        expect(response).to redirect_to '/users/sign_in'      end    end
    context 'ログインしている場合' do      before { sign_in @user }
      it 'HTTPステータス200を返す' do        get '/posts/new'        expect(response).to have_http_status(200)      end
      it 'ログインページにリダイレクトされない' do        get '/posts/new'        expect(response).not_to redirect_to '/users/sign_in'      end    end  end
  describe 'GET /posts/:id' do    context 'ログインしていない場合' do      it 'HTTPステータス200を返す' do        get "/posts/#{@post.id}"        expect(response).to have_http_status '200'      end    end
    context 'ログインしている場合' do      it 'HTTPステータス200を返す' do        sign_in @user        get "/posts/#{@post.id}"        expect(response).to have_http_status '200'      end    end  endend
一度テストを実行して、すべてのテストが通ることを確認しましょう。
$ bin/rspec spec/requests/posts_spec.rb
DEBUGGER: Attaching after process 8205 fork to child process 10953Running via Spring preloader in process 10953
Posts  GET /posts/new    ログインしていない場合      HTTPステータス302を返す      ログインページにリダイレクトされる    ログインしている場合      HTTPステータス200を返す      ログインページにリダイレクトされない  GET /posts/:id    ログインしていない場合      HTTPステータス200を返す    ログインしている場合      HTTPステータス200を返す
Finished in 0.51404 seconds (files took 0.70362 seconds to load)6 examples, 0 failures
これで Request Spec は完了です。
System Spec
次に、詳細ページの表示内容を確認するための System Spec を追加します。先ほどと同様に、テスト実行前に特定の内容を持つ Post を作成しておきます。
spec/system/posts_spec.rb に以下のコードを追加します。
require 'rails_helper'
describe 'Post', type: :system do  before do    driven_by :rack_test    @user = create(:user) # ログイン用ユーザー作成    @post = create(:post, title: 'RSpec学習完了', content: 'System Specを作成した', user_id: @user.id) # 追加  end
  # ...略
  ####### ここから追加 #######  describe 'ログ詳細機能の検証' do    before { visit "/posts/#{@post.id}" }
    it 'Postの詳細が表示される' do      expect(page).to have_content('RSpec学習完了')      expect(page).to have_content('System Specを作成した')      expect(page).to have_content(@user.nickname)    end  endend
このテストでは、特定のタイトルと本文を持つ投稿を作成し、その詳細ページにアクセスした際に、それらの内容と投稿者のニックネームが正しく表示されるかを確認しています。
spec/system/posts_spec.rb の全体像は以下のようになります。
require 'rails_helper'
describe 'Post', type: :system do  before do    driven_by :rack_test    @user = create(:user) # ログイン用ユーザー作成    @post = create(:post, title: 'RSpec学習完了', content: 'System Specを作成した', user_id: @user.id)  end
  # 投稿フォーム  let(:title) { 'テストタイトル' }  let(:content) { 'テスト本文' }
  describe 'ログ投稿機能の検証' do    # ログ投稿を行う一連の操作を subject にまとめる    subject do      fill_in 'post_title', with: title      fill_in 'post_content', with: content      click_button 'ログを記録'    end
    context 'ログインしていない場合' do      before { visit '/posts/new' }
      it 'ログインページへリダイレクトする' do        expect(current_path).to eq('/users/sign_in')        expect(page).to have_content('ログインしてください。')      end    end
    context 'ログインしている場合' do      before do        sign_in @user        visit '/posts/new'      end
      it 'ログインページへリダイレクトしない' do        expect(current_path).not_to eq('/users/sign_in')      end
      context 'パラメータが正常な場合' do        it 'Postを作成できる' do          expect { subject }.to change(Post, :count).by(1)          expect(current_path).to eq('/')          expect(page).to have_content('投稿しました')        end      end
      context 'パラメータが異常な場合' do        let(:title) { nil }
        it 'Postを作成できない' do          expect { subject }.not_to change(Post, :count)          expect(page).to have_content('投稿に失敗しました')        end
        it '入力していた内容は維持される' do          subject          expect(page).to have_field('post_content', with: content)        end      end    end  end
  describe 'ログ詳細機能の検証' do    before { visit "/posts/#{@post.id}" }
    it 'Postの詳細が表示される' do      expect(page).to have_content('RSpec学習完了')      expect(page).to have_content('System Specを作成した')      expect(page).to have_content(@user.nickname)    end  endend
テスト実行
最後に、すべてのテストを実行して、正常に動作することを確認しましょう。
$ bin/rspec
...
Finished in 1.12 seconds (files took 0.23092 seconds to load)51 examples, 0 failures
テストの数が増えてきていますが、すべてのテストが通過していることが確認できました。テストを書くことで、機能が正しく動作していることを自動的に確認でき、将来の変更によって既存の機能が壊れていないかを確認することができます。
変更をコミット
ここまでの変更をコミットしておきましょう。
$ git add .$ git commit -m "学習ログ詳細ページを作成"$ git pushこれで、学習ログ詳細ページの実装は完了です。次は投稿一覧や削除機能などを実装していくことで、より使いやすいアプリケーションになっていくでしょう。
Basicプランでより詳しく学習
この先のコンテンツを読むにはBasicプラン以上が必要です。より詳細な解説、実践的なサンプルコード、演習問題にアクセスして学習を深めましょう。